Settings
A-Parser contains the following groups of settings:
- General Settings - main program settings: language, password, update parameters, number of active tasks
- Thread Settings - settings for threads and unique identification methods for tasks
- Scraper Settings - ability to configure each individual scraper
- Proxy Checker Settings - number of threads and all settings for the proxy checker
- Additional Settings - optional settings for advanced users
- Task Presets - saving tasks for future use
All settings (except general and additional) are saved in so-called presets - sets of pre-saved settings, for example:
- Different preset settings for the scraper
 SE::Google - one for scraping links with a maximum depth of 10 pages with 100 results, the other for assessing query competition, scraping depth 1 page with 10 results
 - Different proxy checker settings presets - separate ones for HTTP and SOCKS proxies
For all settings, there is a default preset (default), it cannot be changed; all changes must be saved in presets with new names.
General Settings
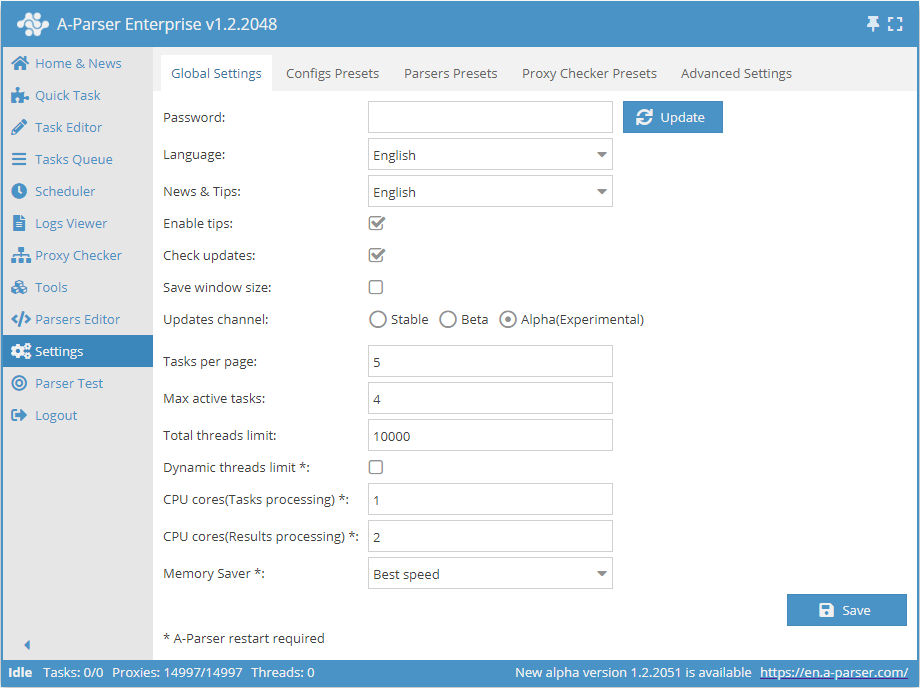
| Parameter Name | Default Value | Description |
|---|---|---|
| Password | No password | Set a password for entering A-Parser |
| Language | English | Interface language |
| News and Hints | English | Language of news and hints |
| Enable Hints | ☑ | Determines whether to display hints |
| Check for updates | ☑ | Determines whether to display information about the availability of a new update in the Status Bar |
| Save window size | ☐ | Determines whether to save the window size |
| Update channel | Stable | Select update channel (Stable, Beta, Alpha) |
| Tasks per page | 5 | Number of tasks per page in the Task Queue |
| Maximum active tasks | 1 | Maximum number of active tasks |
| Global thread limit | 10000 | Global thread limit in A-Parser. A task will not start if the global thread limit is less than the number of threads in the task |
| Dynamic thread limit | ☐ | Determines whether to use Dynamic Thread Limit |
| CPU cores (task processing) | 2 | Support for processing tasks on different processor cores (Enterprise license only). Described in more detail below |
| CPU cores (results processing) | 4 | Multiple cores are used only for filtering, Results Constructor, Parse custom result (all license types) |
| Memory Saver | Best speed | Allows you to determine how much memory the scraper can use (Best speed / Medium memory usage / Save max memory). More details... |
CPU cores (task processing)
Support for task processing on different processor cores, this feature is available for Enterprise license only
This option speeds up (many times over) the processing of multiple tasks in the queue (Settings -> Maximum active tasks), but does not speed up the execution of a single task
Intelligent task distribution across worker cores is also implemented, based on the CPU load of each process. The number of processor cores used is set in the settings, default is 2, maximum is 32
As with threads, it is better to approach the choice of the number of cores experimentally; reasonable values would be 2-3 cores for 4-core processors, 4-6 for 8-core, etc. It should be taken into account that with a large number of cores and their heavy load, 100% load of the main control process (aparser/aparser.exe), at which further increase in the number of processes for processing tasks will only cause general slowdown or unstable operation. It should also be considered that each task processing process can create an additional load up to 300% (i.e., load 3 cores simultaneously by 100% ), this feature is associated with multi-threaded garbage collection processing in the JavaScript v8 engine
Thread Settings
The operation of A-Parser is based on the principle of multi-threaded data processing. The scraper executes tasks in parallel in separate threads, the number of which can be flexibly varied depending on the server configuration.
Description of thread operation
Let's understand what threads are in practice. Suppose you need to compile a report for three months.
Option 1 You can compile the report first for the 1st month, then for the 2nd, and then for the 3rd. This is an example of single-threaded operation. Tasks are solved sequentially.
Option 2 Hire three accountants who will compile reports each for one month. And then, upon receiving the results from the three, compile a general report. This is an example of multi-threaded operation. Tasks are solved simultaneously.
As seen from these examples, multi-threaded operation allows the task to be completed faster, but at the same time requires more resources (we need 3 accountants instead of 1). Multithreading works similarly in A-Parser. Suppose you need to scrape information from several links:
- with one thread, the application will scrape each site one by one
- when working with multiple threads, each will process its link, and upon completion, will proceed to the next unprocessed one in the list
Thus, in the second option, the entire task will be completed much faster, but it requires more server resources, so it is recommended to comply with the System Requirements
Thread configuration
Thread settings in A-Parser are configured separately for each task, depending on the parameters required for its execution. By default, 2 thread configurations are available: for 20 and 100 threads, for default and 100 Threads respectively.
To access the settings of the selected config, you need to click on the pencil icon , after which its settings will open.
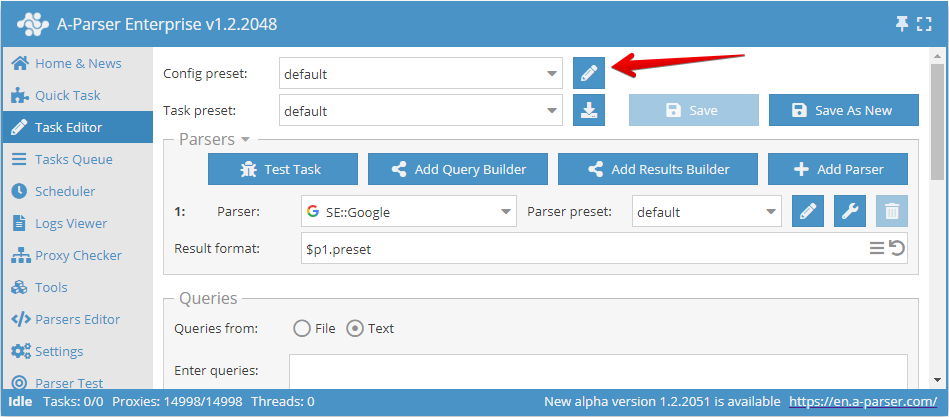
You can also access the thread settings through the menu: Settings -> Thread Settings
Here we can:
- create a new configuration with your own settings and save it under your name (Add New button)
- make changes to an existing config by selecting it from the dropdown list (Save button)
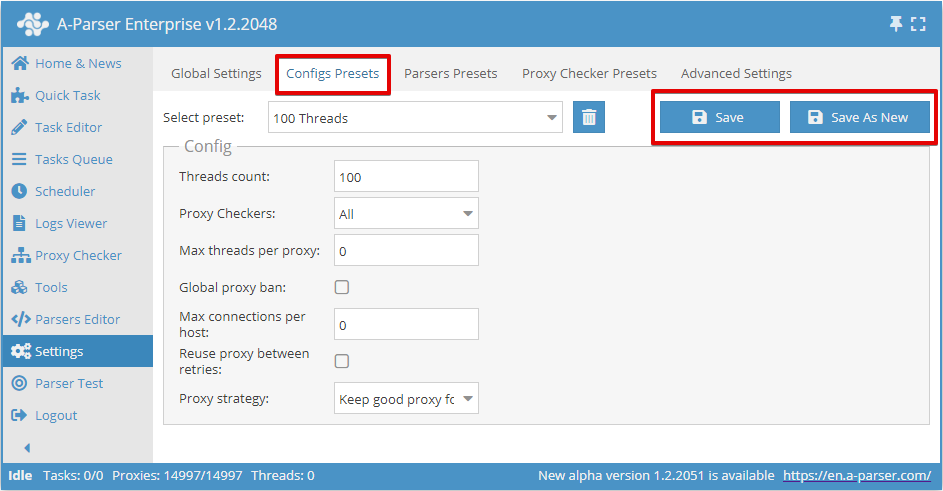
Threads count
This parameter sets the number of threads in which the task launched with this config will operate. The number of threads can be anything, but you need to consider the capabilities of your server, as well as the proxy tariff limit, if such a limit is provided. For example, for our proxies, you can specify no more than the selected tariff.
It is also important to remember that the total number of threads in the scraper is equal to the sum of running tasks and enabled proxy checkers with proxy checking enabled. For example, if one task is running on 20 threads and two tasks are running on 100 threads each, and one proxy checker is also running, in which proxy checking is enabled with 15 threads, the total number of threads the scraper will use is 20+100+100+15=235 threads. At the same time, if the proxy tariff is designed for 200 threads, there will be many failed requests. To avoid them, you need to lower the number of threads used. For example, disable proxy checking (if it is not needed, this will save 15 threads) and lower the number of threads in one of the tasks by another 20 threads. Thus, for one of the running tasks, you need to create a configuration for 80 threads, leave the rest as is
Proxy Checkers
This parameter allows you to select a proxy checker with specific settings. Here you can choose the parameter All, which means using all running proxy checkers, or only those that need to be used in the task (multiple positions can be selected)
This setting allows you to run a task only with the necessary proxy checkers. The process of setting up a proxy checker is discussed here
Max threads per proxy
Here, the maximum number of threads on which the same proxy will be used simultaneously is set. Allows you to set different parameters, e.g., 1 thread operation = 1 proxy.
By default, this parameter is set to 0, which disables this function. In most cases, this is sufficient. But if you need to limit the load on each proxy, then it makes sense to change the value
Global proxy ban
All tasks launched with this option share a common proxy ban database. The feature of this parameter is that the list of banned proxies for each scraper is common to all running tasks.
For example, a banned proxy in  SE::Google in task 1 will also be banned for
  SE::Google in task 2, but it can freely work in
  SE::Yandex in both tasks
Max connections per host
This parameter specifies the maximum number of connections per host, designed to reduce the load on the site when scraping information from it. In fact, specifying this parameter allows you to control the number of requests at one moment, for each specific domain. Enabling this parameter applies to the task; if you run several tasks simultaneously with the same thread config, the limit will be counted for all tasks.
By default, this parameter is set to 0, i.e., disabled.
Reuse proxy between retries
This setting disables the uniqueness check for the proxy for each attempt, and the proxy ban will also not work. This, in turn, means the possibility of using 1 proxy for all attempts.
This parameter is recommended to be enabled, for example, in cases where it is planned to use 1 proxy, where the output IP changes with each connection.
Proxy strategy
Allows you to manage the proxy selection strategy when using sessions: retain the proxy from a successful request for the next request or always use a random proxy.
Recommendations
This article discusses all the settings that allow you to manage threads. It is worth noting that when configuring thread config, it is not necessary to set all the parameters specified in the article; it is enough to set only those that will ensure receiving the correct result. Usually, you only need to change Threads count, the rest of the settings can be left as default.
Scraper Settings
Each scraper has many settings and allows you to save different sets of settings in presets. The preset system allows you to use the same scraper with different settings depending on the situation; let's look at the example of the  SE::Google:
Preset 1: "Scraping the maximum number of links"
- Pages count:
10 - Links per page:
100
Thus, the scraper will collect the maximum number of links by going through all the search result pages
Preset 2: "Scraping query competition"
- Pages count:
1 - Links per page:
10 - Results format:
$query: $totalcount\n
In this case, we get the number of search results for the query (query competition), and for greater speed, it is enough for us to scrape only the first page with a minimum number of links.
Creating presets
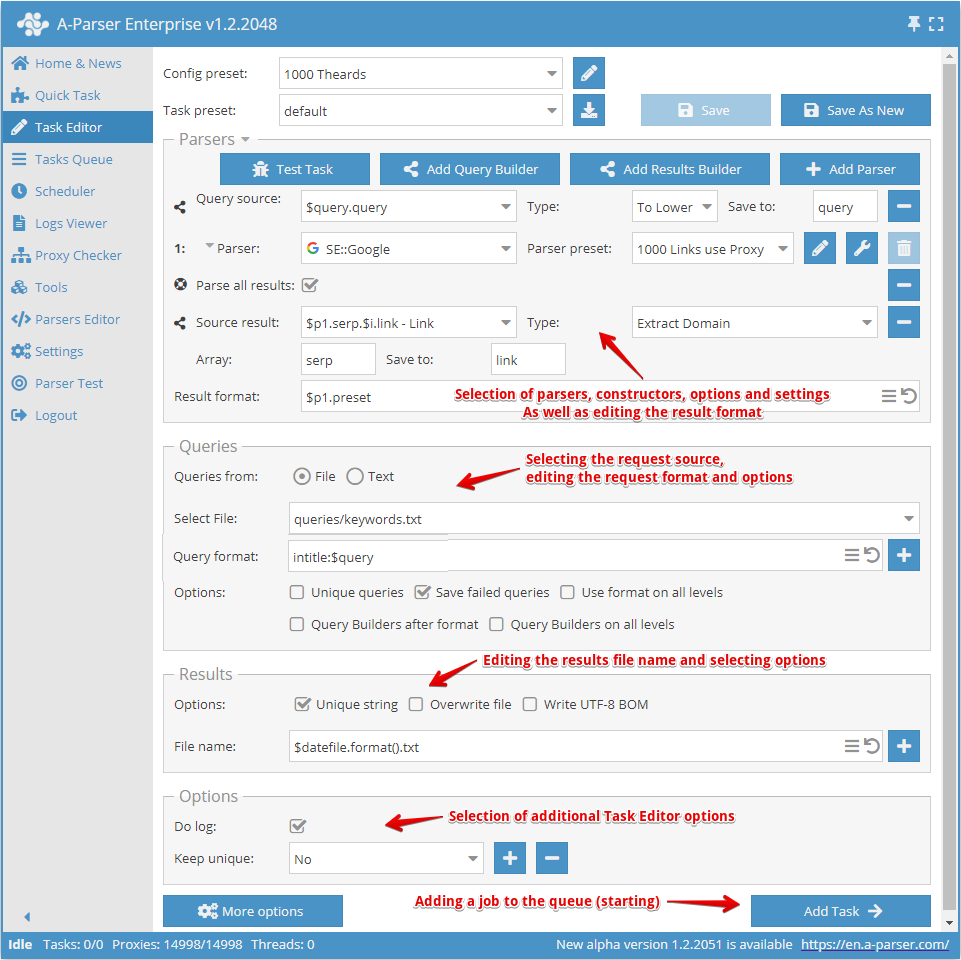
Creating a preset begins with selecting the scraper/scrapers and determining the result to be obtained.
Next, you need to understand what the input data will be for the selected scraper; the  SE::Google, scraper is selected in the screenshot above, and its input data are any strings as if you were searching for something in a browser. You can select a request file or enter requests in the text field.
Now you need to override the settings (select options) for the scraper, add unique identification. You can use the Query Constructor, if you need to process queries. Or use the Results Constructor, if you need to process the results somehow.
Next, you need to pay attention to editing the result file name and change it at your discretion if necessary.
The final step is choosing additional options, especially the Write log. option, which is very useful if you want to find out the reason for a scraping error.
After all this, you need to save the preset and add it to the task queue.
Overriding settings
Override preset - quick overriding of settings for the scraper; this option can be added directly in the Task Editor. You can add several parameters with one click. Default values are indicated in the list of settings, and if an option is highlighted in bold, it means it has already been overridden in the preset
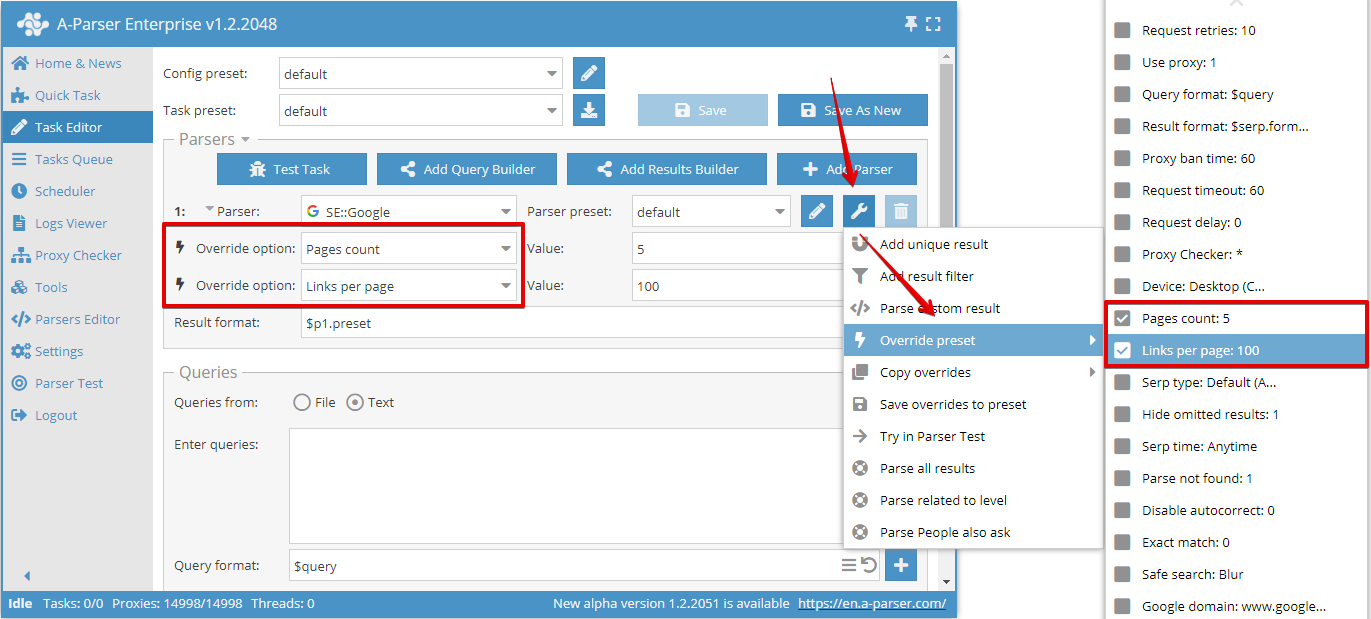
In this example, two options are overridden: Pages count was set to 5 and Links per page was set to 100.
You can use an unlimited number of Override preset, options in a task, but if there are many changes, it is more convenient to create a new preset and save all changes in it.
You can also easily save overrides using the Save Overrides function. They will be saved as a separate preset for the selected scraper.
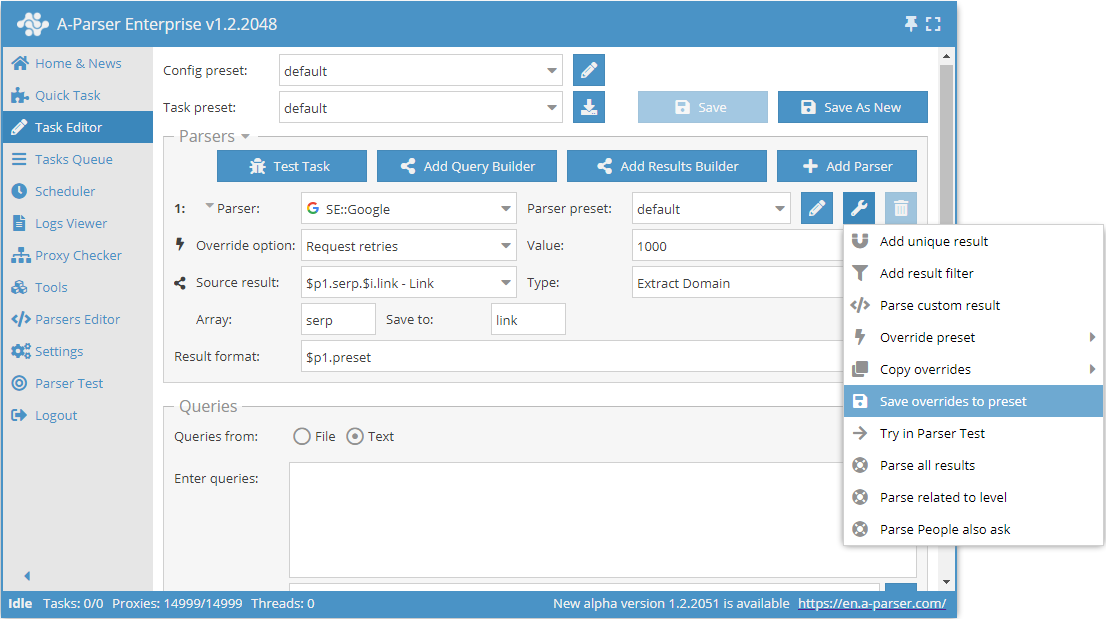
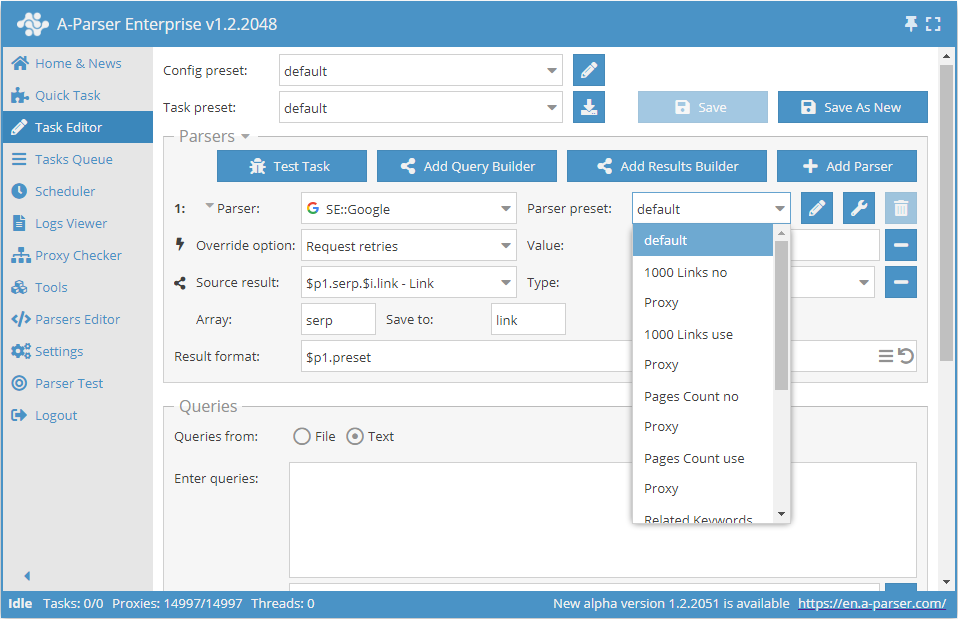
After which, in the future, it is enough to simply select this saved preset from the list and use it.
Common settings for all scrapers
Each scraper has its own set of settings; you can find information on the settings of each scraper in the corresponding section
In this table, we presented common settings for all scrapers
| Parameter Name | Default Value | Description |
|---|---|---|
| Request retries | 10 | Number of retries for each request; if the request fails to execute within the specified number of attempts, it is considered unsuccessful and is skipped |
| Use proxy | ☑ | Determines whether to use proxies |
| Query format | $query | Request format |
| Result format | Each scraper has its own value | Result output format |
| Proxy ban time | Each scraper has its own value | Proxy ban time in seconds |
| Request timeout | 60 | Maximum request wait time in seconds |
| Request delay | 0 | Delay between requests in seconds; you can specify a random value in a range, for example 10,30 - delay from 10 to 30 seconds |
| Proxy Checker | All | Proxies from which checkers should be used (choice between all or listing specific ones) |
Common for all scrapers working over HTTP protocol
| Parameter Name | Default Value | Description |
|---|---|---|
| Max body size | Each scraper has its own value | Maximum page size in bytes |
| Use gzip | ☑ | Determines whether to use compression for transferred traffic |
| Extra query string | Allows you to specify additional parameters in the request string |
| Max body size | Each scraper has its own value | Maximum page size in bytes |
Proxy Checker Settings
More about Proxy Checker Configuration
Additional Settings
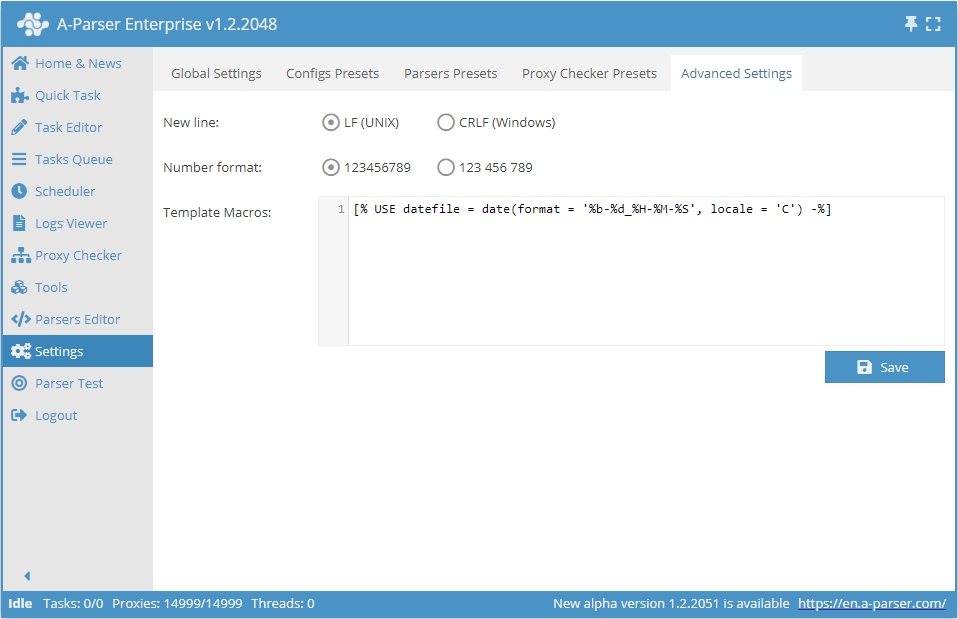
- Line break allows you to choose between Unix and Windows line ending conventions when saving results to a file
- Number format - sets how numbers are displayed in the A-Parser interface
- Template macros